Information on Rosetta landing zone, including unofficial fly by trajectory.
Reblogged from:


Copyright ESA/Rosetta/NAVCAM – CC BY-SA IGO 3.0/ A.COOPER.
All photos below have the same credit. Full credits at the bottom. Annotations are repeated and overlaid from photo to photo. A blanket key for all of them is provided below.


Key:
(All references to up/down/left/right are in ‘upright duck’ mode i.e. with the smaller head lobe at the top and as it’s shown in these photos).
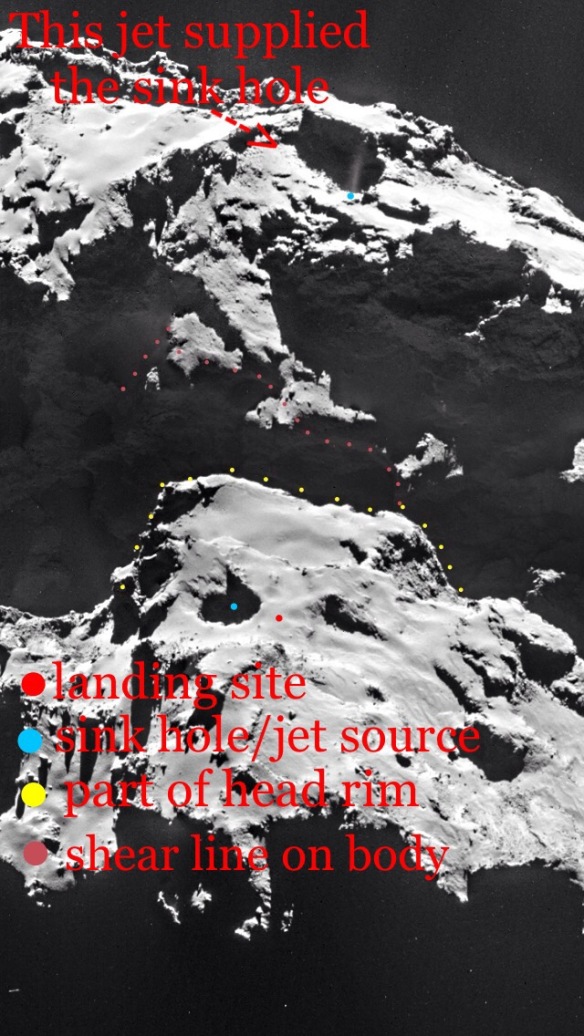
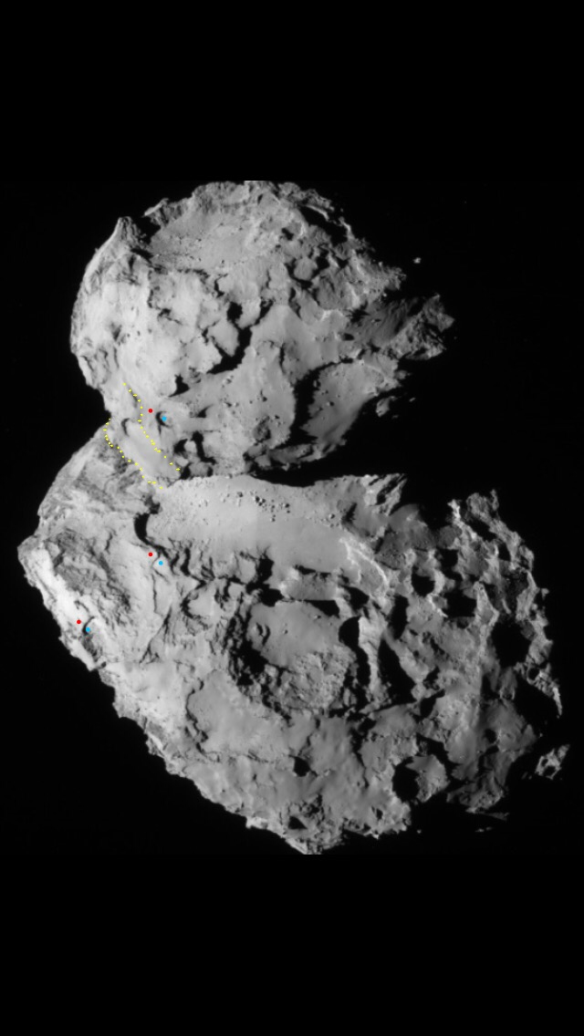
Top red- the September 30th 2016 landing site proposed for the Rosetta orbiter.
Bottom red- the matching point on the body that nested over the landing site.
Middle red- the point on the shear line where both the landing site and its body match were nested together. The body red dot nested over the landing site red dot.
Top light blue- the sink hole that Rosetta will presumably fly over just before landing.
Bottom light blue- the jet on the body that supplied the sink hole mentioned above. Please note that this is therefore the matching point to the sink hole next to the landing site. Its identification is the reason for this post and the suggested low flyby to collect data from it at close quarters.
Middle light blue- the point where the layer containing the jet and the layer containing the sink hole nested (sink hole over jet source).
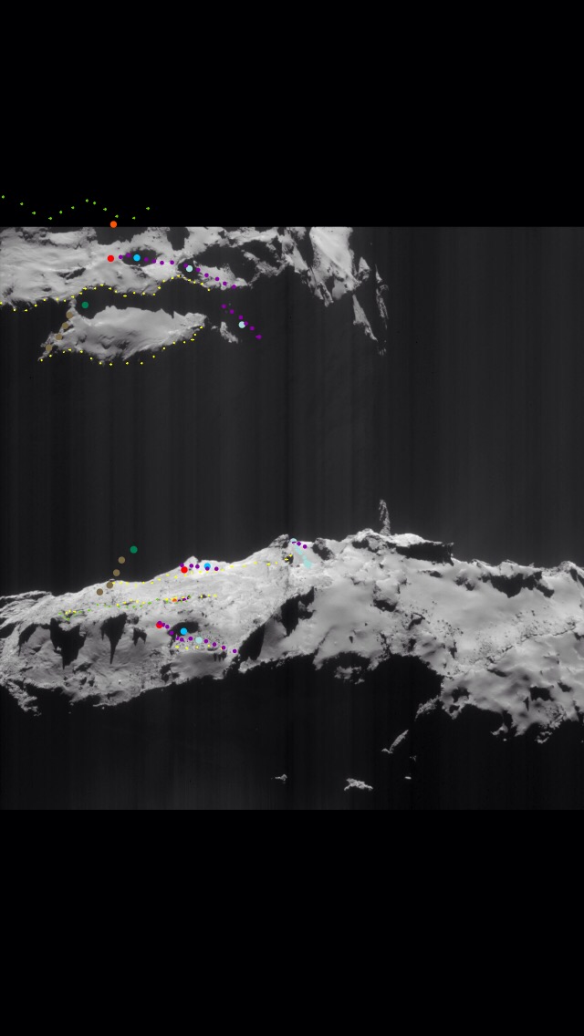
Pale blue- other sink holes on the head that Rosetta will presumably overfly, along with body source (Parts 35 to 37). The body source is effectively one source right on the shear line but is extended back a bit due to the vagaries of the delaminations in this area opening up that small flat area. Apologies for the similar colour- sink holes are always dotted blue but pale blue was used here to differentiate them from the more important, main sink hole match for this post. The mauve flyby track on the body for the source of these pale blue holes runs across the pale blue dot on the body. This is the best theoretical track- I realise it’s impossible to do at very low altitude and would result in a crash into Hathor. A similar argument applies to the other mauve tracks but they become increasingly viable as you move down the body, culminating in the most important one, the jet, being the easiest. But it’s still tricky due to orbiting well off the rotation plane of the comet at such close quarters.
Mauve- suggested flyby tracks over the areas that would contain residue from layers below and above the sink hole and landing area.
Orange dot on body- the sweet spot for material that was closest to the landing site level (down through the layers as opposed to left/right/up/down across the surface). It’s almost invisible in the low, side view version as is its mauve slide track.
Orange dot on head (half hidden under the layer denoted by the green line)- this is where the orange dot on the body was attached. Strictly speaking, the orange dot on the body is a very short delaminated line between the yellow line and bright green line it sits between. That’s because this layer broke from the orange dot on the soon-to-be head and delaminated as it slid from the shear line.
Yellow- the layers that sheared from each other at the shear line. This happened when the head was still on the body. The line following the bottom of the head lobe is the head rim layer and that sat on the yellow line hosting the middle pair of red and blue dots. The next yellow layer up on the head attached to the second yellow line down on the body- again on the shear line above the middle pair of red and blue dots. These two layers also slid away from the shear line, one up the head and one down the body.
Bright green- this is the top layer that also tore at the shear line with one layer sliding up the head and one down the body. They both slid further up the head and down the body than the two halves of the layer below (which was the second pair of yellow lines described above). This is because the bright green layer was the first layer to unzip and the other layer was underneath it.
Dark green- another sink hole on the head with its matching source at the shear line below. The body version should be visualised as being in ‘mid-air’ above its source with its beige chimney curving up from the curved cave which is the source of the gas flow for the hole.
Beige- the centre of the chimney for the dark green hole. It’s curved because the chimney forms half a bell shape. The bottom perimeter of the bell shape on the head nests over and around the curved source on the body which is often described as a cave. Regular readers will recognise this cave as the fifth ‘gull wing’ set.
INTRODUCTION
This is a short post. There’s a longer draft that’s not complete and that goes into detail on the specific mechanism of sliding layers to prove why the landing site matches to the body as described here. However, since the whole point of the post is to suggest a flyby of the body areas that match the landing site and to have ample time to do so, I’m posting this cut-down version early.
If you’re familiar with Parts 38 to 41 you won’t need the explanation, you’ll see fairly quickly why all these apparently random layers and mauve flyby tracks are so disjointed and how they all zip up together again. The three red/blue dot pairs nest as one pair at the site of the middle pair. The mauve flyby tracks all nested over the dot pair as one track on the original comet before the head sheared.
The most interesting match here is that the sink hole next to the landing site matches to a particular jet on the body. Rosetta presumably overflies this and two others nearby just before landing. I say “presumably” because the actual ground track hasn’t been published but the relevant Rosetta blog post says the landing site was chosen so as to get close-up data from several sink holes on approach. The hole and its matching jet on the body are the top and bottom light blue dots as described above in the key. Not to be confused with the extra pale blue ones on the right in the later photo.
The other interesting match is the actual landing site match and the orange dot on the body which denotes the delaminated material that sat just above the landing site. The most relevant material that was directly on top of the landing site is that material which is kissing the yellow line next to the dot.
The Capaccioni et al 2015 frost cycle video bears corroborates the sink hole match to the jet. It doesn’t prove it. For the proof, via matching and slide tracks, is laid out in Parts 38-41. Reading parts 31-37 would also be very useful as background information . It’s corroborating evidence that the mechanisms described here were happening at Aswan/Ma’at too and there are similar far-flung matches between the back rim of Aswan and the head lobe.
I may not get round to publishing the full version of this post before the landing but would still do so at some time because it’s a spectacular match. It might be a new post but it will get added here for sure anyway.
If the Rosetta mission express an interest in executing one or more of these flyby tracks, I would drop all the other posts currently being researched and hurry the main article through.
CONCLUSION
The detailed collecting of data by Rosetta and Philae over the last two years has been a wonderful achievement and it will be available for years to come for refining theories about 67P, comets in general and the formation of the solar system. However, knowing that the comet stretched and how it stretched, points to the most interesting places to collect data. That’s especially the case for analysing and comparing known matches on head and body.
The landing of Rosetta on 67P is probably the very best opportunity we’ll have: a close flyby of a sink hole on the head, preceded by this suggested close flyby of a known jet and its source material that caused the sink hole to appear in the first place. It’s all the more interesting owing to the exactitude of the match, its small area and the fact that it involves a jet and its sink hole, not just another matching shape.
PHOTO CREDITS (ALL FROM NAVCAM):
Copyright ESA/Rosetta/NAVCAM – CC BY-SA IGO 3.0
To view a copy of this licence please visit:
http://creativecommons.org/licenses/by-sa/3.0/igo/
All dotted annotations by A. Cooper
No comments:
Post a Comment